Pages

Showing posts with label iPhone Data Recovery. Show all posts

Wednesday, July 20, 2016

How to Speed Up Your Slow iPhone?

How to Speed Up Your iPhone? 

Whether you're still worried about updating to iOS 8 on your iPhone 4s, or you simply want to make sure your brand-new iPhone 6 or iPhone 6 Plus stays as quick as the day you bought it, here's how to both reverse slow down and maintain speed.

Luckily, we've got some tips and tricks to hopefully help you speed things up. The first thing you need to is to free up space to spare more available storage on your device. No matter what model of iPhone you are working with, iPhone 4, iPhone 4s, iPhone 5, iPhone 5s, iPhone 5c, iPhone 6 or iPhone 6 Plus, you can benefit from our speed tips for slow iPhones. Now let's get it started!

Restart

Your iPhone also is a miniature computer, so it should be treated as such. While most of us have the habit of leaving our iPhone on all the time, and never close it. In fact, it is healthy to restart it once in a while. Because it will clear out the memory space and fix unruly apps.


Restart iPhone Completely to Speed Up Your iPhone

Many times, a sluggish iPhone can be fixed by simple rebooting it. Let's restart the iPhone completely. Press and hold the Sleep button (the one on the top right of the iPhone) until the Power Off slider appears. Swipe it and wait for the iPhone to power down.

Once it's finished (it'll take about 10 seconds or so), start the iPhone up again by pressing and holding the Sleep button for about 5 seconds. You'll see the Apple icon for a minute or so, then the iPhone will restart.

Clear caches and data


If the Safari web browser is sluggish, you can clear the cache by going to Settings > Safari > Clear History and Website Data. You can even do it on a site-by-site basis by tapping Advanced > Website Data, and then choosing the sites you want to remove.

Close All Apps Running in the Background

Let's start with the easiest solution: closing down all on-essential apps.

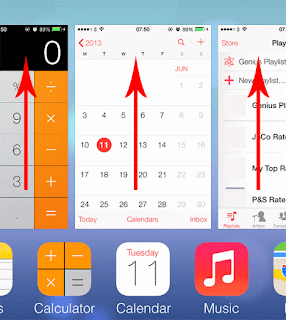
Closing Apps that are running in the background can make your iPhone run a little faster, especially when you are running a big, cumbersome app. Follow us to close the open Background Apps on iPhone:

Double-click the Home button to bring up all the Apps running in the background > Swipe upwards to close them.


Reduce Motion

Apple introduced some cool motion and animation effects called Parallax back in iOS. While they look cool, making your iPhone carry these out each time you open an app drains both the battery and requires your RAM and processors to work harder, slowing down your phone. Those animations as you flick between apps look good, but they're another process your iPhone has to go through as you use it.


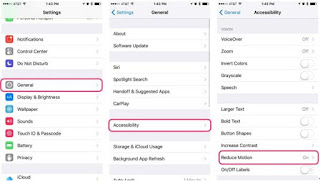
If you don’t need the eye candy it’s best to disable the animations. To do this: Go to Settings, General and then Accessibility. In there, you’ll find the Reduce Motion option that has to be toggled on as well.

Reset settings

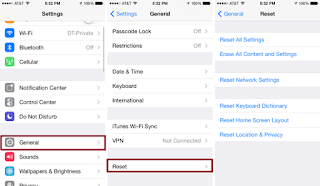
A slightly more extreme step that will let you keep your apps and photos but will reset the iPhone settings such as your Touch ID, app permissions, display settings and so on, many people have reported improved performance with the reset, which is another way of spring cleaning your phone.

However, it will remove a lot of stored data such as Wi-Fi networks, alarms and Siri. It is only recommended if needed.

Go to Settings -> General -> Reset -> Reset All Settings to go through with it.


Turn off features you're not using


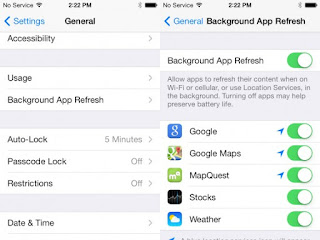
Anything that runs on your iPhone will use processing cycles. That means anything you turn off will free up those cycles. If you don't want to, or can't, delete an app, you can still turn off its push notifications, background refresh, and other processes. Not surprisingly, it's the same steps you go through to preserve battery life.

Delete apps you're not using and Use Apple's apps

Just because you're no longer using an app doesn't mean it's no longer using your iPhone's resources. Depending on the app, it might have background processes, background refresh, background notifications, and other tasks running. If you don't need it, delete it. You can always re-download it again later.

Apple's official apps - Mail, Camera, Maps, Safari and so on - have special permissions that often allows them to run more quickly and efficiently than third-party apps.

Of course, many people prefer alternatives like Google Maps, Chrome or Outlook, but if these are slowing you down, it may be worth it to switch.
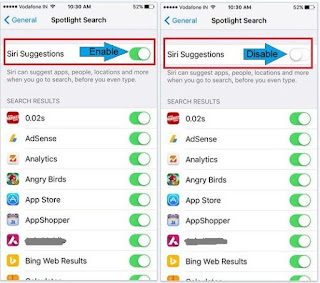


Disable Siri

Users can disable Siri suggestions from the Settings app: go to General, Spotlight Suggestions and turn Siri Suggestions off. However, since the feature also happens to be one of the main new capabilities in iOS 9, some users might want to keep it on, particularly if they’re Siri fans.


Restore and clear out unused media on your iPhone

If none of the above tips are getting the speed boosts you need to see, restoring and cleaning out your iPhone may be worth a try. First, try deleting apps you don't use. Keep in mind older devices will never run newer versions of iOS as optimally as the most current hardware though.

You can check how much storage you have remaining by going to Settings > General > About. If you feel you should have more storage available than what you're iPhone is telling you that you have, trying a restore in iTunes to free up some space iOS may have corrupted or junked isn't a bad idea. It should be a last restore but it may be worth a try to a lot of folks before they decide to pull the trigger on a new iPhone.

Upgrade Your iPhone to the Latest iOS Version


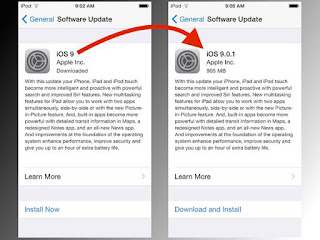
Every iOS update contains performance improvements, including improvements specifically for older hardware. Normally, the software update includes bug fixes, and some of them can be related to an issue that makes your iPhone slow or glitch. Therefore, when your iPhone notes you there is a software update for your iDevice, don't hesitate to upgrade to the latest iOS version.

Go to Settings > General > Software Update and make sure you're running the latest version.

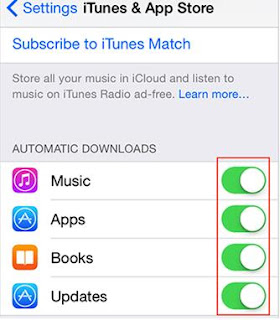
Turn Off Auto App Updates

If your iPhone is running slowly, that's because it may be trying to update apps in the background. So turn off auto app updates, and choose to update your apps manually to make your iPhone run faster. To change this with the steps below:

Settings -> iTunes & App Store -> Automatic Downloads -> Close the Apps and Updates by switching the sliders to off modes.


Restore with iTunes, not iCloud

iCloud updates are convenient but they work incrementally. And sometimes bits and pieces of bad data can be transferred from update to update. I’ve definitely had cleaner installs, as have many others, using iTunes. Since iTunes extracts and decompresses files on your computer as opposed to your iPhone or iPad, you’re getting a clean version of iOS, instead of an incremental update.

Along with doing a clean restore in iTunes, I also highly recommend backing up to iTunes and restoring from that backup instead of your current iCloud backup. Once you’ve restored, you can go back to backing up to iCloud as normal.

If you aren’t sure how to create an iTunes backup, we can walk you through that: Once you’ve created a backup and you’re ready to restore, just follow these steps:
Plug your iPhone into your computer and launch iTunes.

Open the device summary page by clicking the phone icon in the upper left corner. Click on Restore iPhone and follow the on-screen prompts. If you have Find My iPhone enabled, you’ll be prompted to turn that off before you can continue.

Once the restore is complete, you’ll be asked whether you want to set up as a new iPhone or restore from a backup. This is where you can choose the backup you created before restoring. If you really want to make sure your iPhone runs as fast as possible, you can set up as a new iPhone. Just be aware that no personal media will be brought over. So be sure you back up photos and videos before going that route. Messages will be lost but things like apps and purchased iTunes content can be re-downloaded on-demand.

Restore to factory settings

The most drastic step of all: we're going to perform a full restore, which deletes all the data on the iPhone and returns it, in effect, to the state it was in when you bought it. (Except that the hardware components will still have suffered a number of years of wear and tear, of course.)

Since we're deleting all the data, it's vitally important that you back up the iPhone: either back up to iTunes, as described above.

Now you can restore the iPhone to its factory settings by going to Settings, General, Reset, Erase All Content and Settings. You'll then have to enter your passcode if you've got one, and then confirm that you want to delete all media and data, and reset all settings.

After a few minutes of restoring, you'll be presented with the welcome screen you saw when you first started up the iPhone.

The last resort: get a new iPhone

If Apple can't help, or their help is too expensive to be worth it or If all the tips can’t help, we reach the final option: give up on your older iPhone and buy something newer.

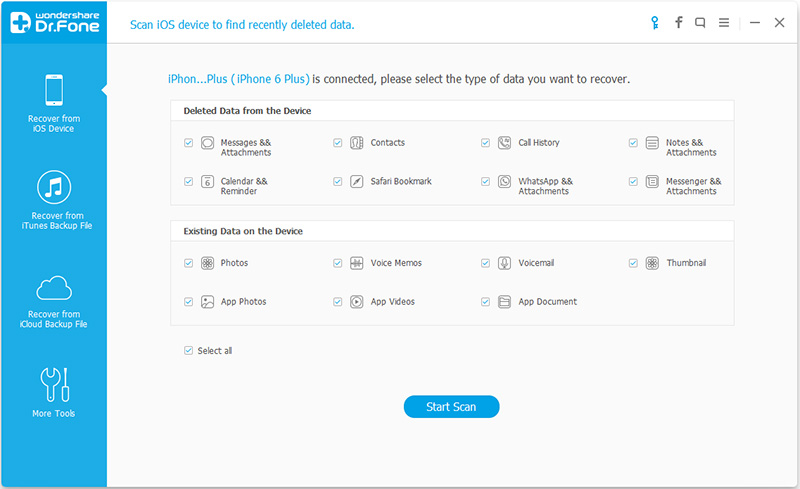
If you find some important files lost, don’t worry. There are some iOS data recovery software like Wondershare Dr.Fone for iOS to recover those lost data by accidental deleted from iPhone.


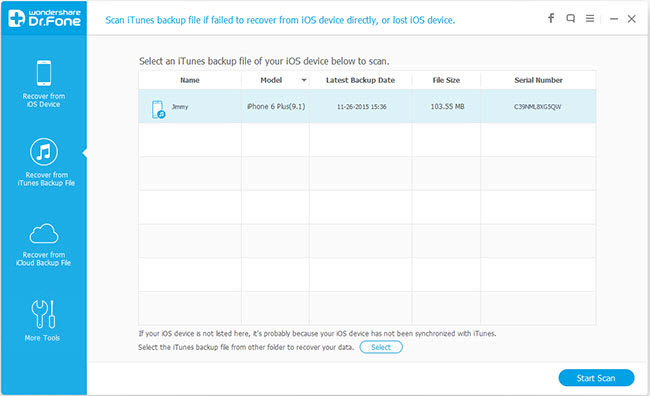
Download iPhone Data Recovery Software:


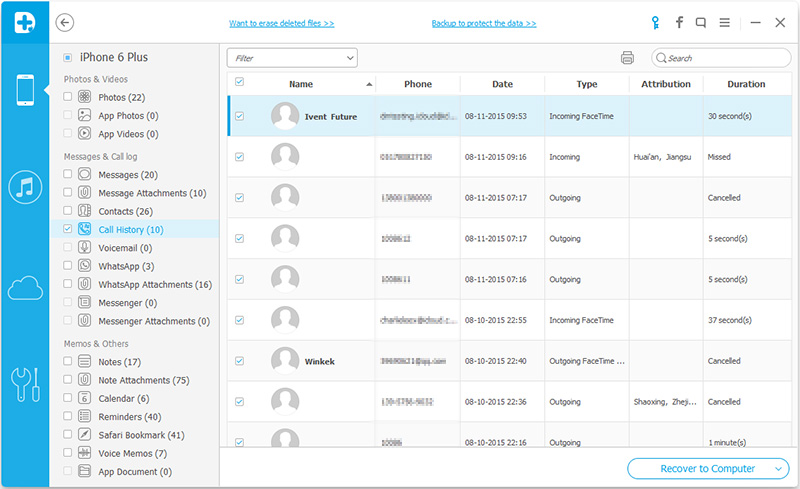
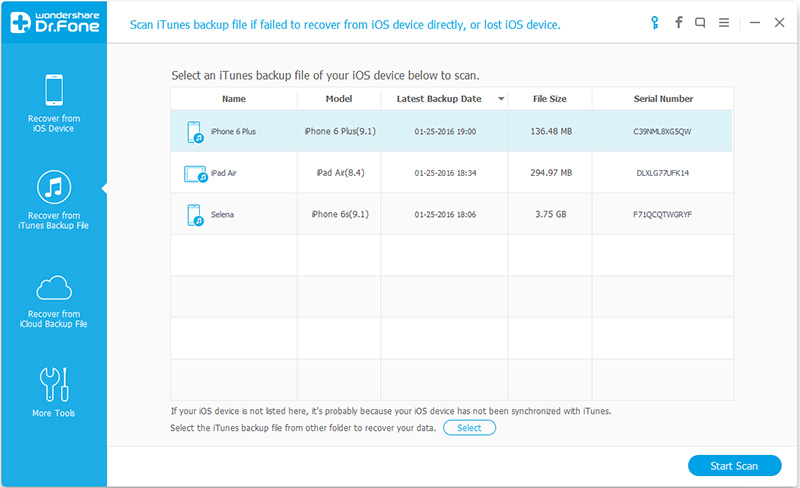
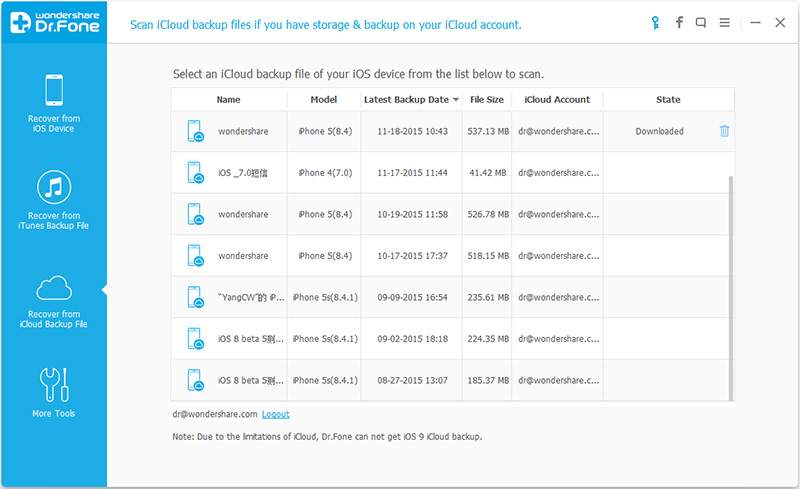
It provides three recovery modes to recover data: ”Recover from iOS Devices”; “Recover from iTunes Backup File”; “Recover from iCloud Backup File”, you can use this powerful iOS Data Recovery to recover all lost data from iPhone, including iPhone 6S, iPhone 6S Plus, iPhone 6, iPhone 6 Plus, iPhone 5S, iPhone 5C, iPhone5, iPhone 4S, iPhone 4, iPhone 3GS. Download and install iPhone Data Recovery on your computer, read this review”: Best iOS Data Recovery Review - Wondershare Dr.Fone for iOS

Buy the iPhone Data Recovery Software:


More related articles you may be like:

How to Recover deleted photos from iPhone (iPhone 6s Plus Included)
How to Recover Deleted Bookmarks on iPhone? 
How to Recover Data from Water Damaged iPhone?
How to Recover WhatsApp Messages from iPhone (iPhone SE, iPhone 6s/6 plus, iPhone 5s/5c/5/4s/4/3gp included)?
3 Ways to Recover Deleted or Lost data from iPhone 6s Plus/iPhone 6s

Friday, May 20, 2016

Recover iPhone Call History, Extract iPhone Call History

"Can I recover deleted call history/call log on iPhone?" Of course, with the help of iTunes, you are able to restore your iPhone with the backup, and get the deleted files back to iPhone. When the restoring process is finished, you will get their deleted call history back to your iPhone. As is known, iTunes will ask users to erase all content and settings before restoring iPhone with the backup, so people may lose newly added data on their iPhone if users haven’t backed the data up. 

You can also use iCloud to restore iPhone call history/call log with an iCloud backup. After people enabled iCloud on your iPhone, the iPhone data will be uploaded to the cloud when the device is plugged in with the screen locked, and connected to Wi-Fi. Then your will be able to restore their iPhone with the backup when you want to recover deleted call history from iPhone. After the restoring process, the deleted files will be recovered. Like using iTunes to restore iPhone backup, iCloud will also need users to erase all content and settings before restoring the device. 

However, If you don't want to mess up all data with iTunes or iCloud, is there any way for the users to recover deleted notes from iPhone, include iPhone SE, iPhone 6S/6 (plus), iPhone 5S/5C/5/4S/4/3GS even all iPads and iPod Touch? In fact, you are able to take advantage of the third-party iPhone data recovery programs to finish the task. Hivimoore Dr.Fone for iOS (Review) is used for recovering deleted Call History, Call Log from iPhone/iPad/iPod devices, extracting data from iTunes and iCloud backups. 

Key Features 

  • Recover deleted iPhone call log including incoming, outgoing and missing calls. 
  • Retrieve iPhone call history directly from iPhone, iTunes backup and iCloud backup. 
  • Preview details like phone numbers, names, call dates, duration, etc. 
  • No data damage, modification, leak and risk-free. 
The following guidance will show you how to recover deleted call history on iPhone, and you are allowed to free download the software to have a try. 

 (Buy Windows)   (Buy Mac

3 Ways to Recover Deleted All Call History from iPhone 

Method 1. Directly Recover Call History from iPhone 

Step 1. Connect your iPhone and scan it 

In this way, you need to have your iPhone at hand and get it connected to the computer at first. Then run the program and stay at the recovery mode of "Recover from iOS Devices". When you see the window shown on the right side, you can directly click on the "Start Scan" button to begin scanning your iPhone for lost call history. 

 
Step 2. Preview and recover deleted call history from iPhone 

Once the program finishes scanning your iPhone, it'll present you a scan result showing all recoverable data on your iPhone, not only call logs, but also contacts, messages, photos, videos and so on. But you have the option to preview and decide which items you want to recover. Then tick them and click on the "Recover" button to save them all on your computer with one click. 

 
Method 2. Recover iPhone call history from iTunes backup 

All or nothing, that's what iTunes backup lets us do. You only have the chance to restore everything in the iTunes backup file to your iPhone, or you restore nothing. There is no selectively restoring. What if we want to selectively restore some specific data from the backup? The method below is going to be pretty useful. 

Step 1. Choose and extract iTunes backup file 

You don't need to connect your iPhone to the computer when you choose this way, and don't do it, for the iTunes backup can be easily updated if you've enabled the automatic synchronization. 

Simply launch the program on your computer and choose the mode of "Recover from iTunes Backup Files". Then you'll see that all backup files generated by iTunes on your computer are presented in a list by the program automatically. All you need to do is select the one for your iPhone or the one you want to extract, and click on the "Start Scan" button to get it extracted.. 

 
Step 2. Preview and recover iPhone call log from iTunes backup 

The program can get the backup extracted in a few seconds. Once it's done, you can preview all contents in the backup in details. Choose the "Call History" menu on the left side. You can read your phone call history one by one. Tick the item you want to keep and save it to your computer by clicking on the "Recover" button. 

 
Method 3. Restore iPhone call history from iCloud backup 

Just the same as iTunes, iCloud also doesn't allow you to preview or selective restore specific data from its backup. All you need to do is using a third-party tool that can help you extract the backup for selective recovery and restore. There is also such a way. 

Step 1. Run the program and sign in your iCloud 

Choose to use this way, you need to know your iCloud account, that's to say the Apple ID and the password, so that you can get the online iCloud backup down. 

After running the program, switch to the mode of "Recover from iCloud Backup Files". Then you can directly sign in your iCloud account by putting in the Apple ID and the password. It's totally safe here. Wondershare won't keep or leak any information of your account and data. 

 
Step 2. Download and scan the iCloud backup 

When you've got in, the program can detect all backup files existing in your iCloud account. You can choose the one for your iPhone and click on the "Download" button to get it down to your computer. The downloading process will take you a few minutes. Get yourself a cup of coffee and wait for a moment. 

Note: The downloaded file is only located on your computer. There is no record in the program or any other place. 

 
Step 3. Preview and recover call log for your iPhone 

After the downloading, there will be a scan button appearing. Click it to move on. When the scan is over, you can preview the content of the backup file in detail. Choose the "Call History", and you can read all items one by one. Tick the item you want to recover and save it on your computer. 

 
Additional Tips: How Can I Extract iPhone call history? 

To extract your deleted call logs from your iPhone, you need to extract the SQLite file first, and to extract SQLite file, you need an iPhone data extractor. If you're still not clear about it, my recommendation still isDr.Fone for iOS for Windows or Mac, a reliable and intuitive program that enables you to extract the call log from iPhone, including iPhone incoming call log, outgoing call log and missed call log. You can extract them all to a HTML file on your computer, so you can read and print them easily. 

Download the free trial version of this iphone call log extractor below and try it for free on your computer. 


Let's check how to extract iphone call history with the Windows version in detail. Mac users can do the same steps with the Mac version. 

Step 1. Begin to extract call history from iPhone 

After downloading and installing the program, double click to launch it on your computer. Click "Recover from iTunes Backup File", and you'll get an interface as follows. Here all backup files for your iOS devices will be listed out. Choose the one for your iPhone and click "Start Scan" to move on. 

 
Step 2. Preview and save iphone call history 

You're at the last step now. Choose "Call History" among the items on the left after the scan, and you can preview all incoming, outgoing and missed calls on your iPhone. Mark them and hit on the "Recover" button to save them all on your computer with one click. 

 
At last, you can read and print your call history on your computer now. Additionally, you're enabled to preview and recover photos, contacts, messages, notes and calendar with this iphone call log extractor as you like. 

That's all! If you want to recover deleted Call History from your iPhone even iPad and iPod Touch, or Extract iPhone Call History, you will need help from Dr.Fone for iOS

Editor's Recommendation: 

Thursday, May 12, 2016

Recover Lost Data from iOS 9 Devices with iOS Data Recovery

Are you can't wait to upgrade your iPhone to the iOS 9? That must be great. However, data loss is one of the most common issues after updating to the new iOS 9, and it is always too late to regret never backing up data in iTunes or iCloud. Here we introduce you the three iOS Data recovery modes.

How to Retrieve Lost Data from iOS 9 Devices

"I committed a mistake of not taking a backup of my iPhone data before updating to iOS 9, so when after the iOS update I have lost all my photos, videos, everything. Need desperate help!"

Inherit to iOS 8, iOS 9 is different from previous iOS 8, increased a lot of unexpected new features, get the iPhone users better upgrade experience. However, iPhone system upgrade often will bring certain negative influence to the users, the most direct performance is the loss of iPhone data.

So is there a reliable solution to restore lost data without backup after iOS 9 upgrade? Yes, of course. To get lost data back from iPhone, you can use a profesional iOS Data Recovery. Wondershare Dr.Fone for iOS can help you easily to restore lost data, it offers three reliable and high-efficient ways to recover lost or deleted data from iOS 9 devices. If lost data on your iPhone, please don't use your device again, then all you need is the Wondershare Dr.Fone for iOS software, you can get all lost data from iPhone.

Buy the way, the best iOS Data Recovery can recover all kinds of lost files from iPhone, including Photos, Videos, Music,ContactsText Messages, iMessages, Call History, Calendar, Notes, Call logs, Whatsapp, Voice Memos, iBooks reading etc. What’s more, this iOS Data Recovery supports recover lost data from iPhone 6s/6s plus, iPhone 6/6 plus, iPhone SE, iPhone 5S , iPhone 5C, iPhone 5, iPhone 4S/4 and the New iPad, iPad Pro, iPad mini 4, iPad 4/3/2/1 & iPod touch 5.


Here we introduce you the three recovery modes:
  1. Recover from iOS Devices directly;
  2. Recover from iCloud backup;
  3. Recover from iTunes Backup.
Now, download and install the top-ranked iOS Data Recovery. The installation process is easy to do and it lasts a few minutes.


Method 1. Recover your data directly from iOS 9 device

Step 1.  Connect your smartphone to a computer and lunch the iOS Data Recovery. You will be informed that your iPhone is connected and you will be able to see the model (iPhone 5, 6 and etc.).

How to Retrieve Lost Data from iOS 9 Devices

Step 2. Click "start" and the software will scan your device for lost files. When it is done, you will see the list of all files, the iOS Data Recovery can restore. The list includes messages, videos, call history, photos and a lot more.

How to Retrieve Lost Data from iOS 9 Devices

Step 3. All you need to do is to choose files you want to restore. Remember that checked files will be restored. Also, you can see additional information about those files. Now, click on "recover" and you are done. It usually takes a few minutes and you are done.

Method 2. Selectively recover iOS 9 data from iCloud backup

Step 1. You can also use the iOS Data Recovery to recover your data from iCloud. Connect your iOS device with your computer and launch the best iOS Data Recovery. Sign in to your iCloud account. You should know that your apple ID and password are protected and nobody can know them.

How to Retrieve Lost Data from iOS 9 Devices

Step 2. The software will find all iCloud backups you saved. All you need to do is to hit the download button and download them to your computer. It is recommended to download the latest backup and the one with most files. When the download is complete, click on the same button to extract files.

Step 3. During the process, you can preview certain files. All data, found in the iCloud backup can be restored. If you don’t want to restore certain messages or files, just uncheck them. Remember that downloading and extracting time depends on a size of the backup. If you don’t have enough time, or your internet connection is slow, uncheck files you don’t want to recover. When you are done, just click on "recover" and wait for the Wondershare dr.fone for ios to complete the process.

How to Retrieve Lost Data from iOS 9 Devices
Method 3. Selectively recover iOS 9 data from iTunes backup
Step 1. The best iOS Data Recovery has another option for restoring your data. It is restoring from iTunes backup. The procedure is very simple and similar to previous alternative. Connect your device with your computer and launch the iOS Data Recovery. Choose "Recover from iTunes backup file" and the program will show you all backups that are available.

How to Retrieve Lost Data from iOS 9 Devices

Step 2. Choose the backup file you want and click on "Start scan". After the scan is complete, you will have a complete list of files that are available for recovering. All files will be divided in categories. For most users restoring messages, call history, photos and videos is the most important. Luckily, all of these categories are supported.

How to Retrieve Lost Data from iOS 9 Devices

Step 3. Now, you can select files you want to recover. If you want to recover all files, just check all categories where the files are and click on "recovery" button. Recovering usually last several minutes. When it is done, you will have your data in your computer. If you need a specific file, you can use "Search" option. In addition, you must remember not to disconnect a device while recovery is in progress. Only when it is done, you can disconnect your device from a computer.

Now, there is no need to feel depressed any more. You can choose different versions according to your computer’s operation system, just get more detail information from here: iOS Data Recovery for Windows or Mac. Simply download the free version or buy it and have a try.

Download Mac            |           Buy Mac

Have something to say about this "How to Retrieve Lost Data from iOS 9 Devices" tutorial? Share your comments below!

Related Articles