Note: YouTube also rejects the file exceeding 10 minutes. If your WMV file is too big, you can cut it to the specific length directly in this app.
You can use a program called Video Converter Ultimate. It's easy to use, it's available for Windows and Mac, and it'll convert your WMV file into compatible formats for Youtube.
- YouTube Preset: It directly offers you an optimized preset with the right profile and video & audio codec for YouTube.
- Wide Format Supported: It converts WMV to any YouTube supported formats, such as to FLV, WebM, MPEG4, AVI, MOV and more.
- Fastest Conversion Speed: You can use it to batch convert videos at 30 X fsatest speed and convert videos without quality loss.
- Edit Video: Just use this tool to enhance your video by trimming, cropping, adding effects and more before uploading it to YouTube.
- Download Videos: You can even use it to download videos from YouTube, Facebook, etc.
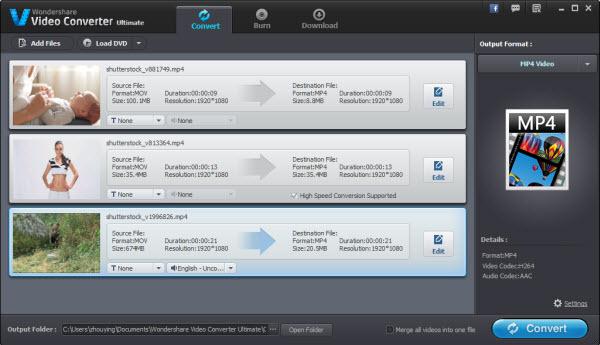
Step 1. Hit the "Add Files" button in the upper left hand corner to import your local WMV files to this app. Alternatively, you can find these WMV files you want on the computer first, and then directly drag them from the folder to this app's left pane.

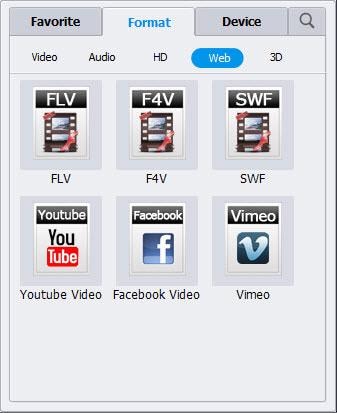
Step 2. Choose an directly-optimized preset for YouTube
On the Output Format panel, simply click the format image or open the dropdown list above, then go to "Format"> "Web" > "YouTube".
Note: If your WMV file is too long to upload to YouTube, you can cut it to the limited length (not more than 10 minutes). First, open the editing panel by clicking the "Edit" option beside each video file bar. Next, go to "Trim" window where you need to drag the two slides to select the clip, and then click the Scissor-like icon and hit Ok to save it.

Step 3. Convert and upload WMV to YouTube
Start video conversion by clicking "Convert" button in the lower right hand corner of this WMV to YouTube's interface. It only takes a few minutes to finish the job. When it's finished, a notice will pop up, saying all the tasks have been finished.
Now, go to YouTube, and log in your account, then upload the converted files to YouTube. That's all. By the way, if you can't find the converted files, you can do it according to the output file path or directly hit the "Open Folder" option at the bottom of the interface.
More Topics
- Top 5 Best Youtube to MP3 Converters and Downloaders
- How to Move and Copy DVD to Android Phone and Tablet for watching on the go?
- How to Play Movies on Galaxy S7/S7 Edge?
- Decode and Encode Samsung NX1 H.265 footage to MOV, MP4, AVI, WMV for editing, burning or playing
- About H.265 and Top-ranked H.265 HEVC Converter
- Convert Videos to H.265 (HEVC) Video on Windows or Mac
- How to Play MP4 video on PS4 from USB Drive?
- Encode MP4 to MPEG-2 for Playing in TV stations, TV receivers, DVD players, Non-linear editing software
- Watch 2K/4K, HD and Common Videos and Movies on any Kids Tablets
- Doesn't play MKV movies on your Android tablet or smartphone?
- Can I play MKV with DTS on Samsung Smart TV?
- Can PS4 play MKV, AVI, VOB, M4V, M2TS, H.265, WMV, FLV, Tivo videos?
- Multiple Ways to Add lossless FLAC files to iTunes and iPhone/iPod/iPad
- How to view 4K videos on Samsung smart TV?
- 2016 Best AnyDVD Alternatives
- Doesn't work to directly copy DVDs to Hard Drive? Solved!
- Top-ranked HandBrake Alternative Reviewed
No comments:
Post a Comment