It is believed that watching DVD movies on the latest Samsung Galaxy Note 5 smartphone will be a great enjoyment to you. Think about it. If you miss the films for theatrical release, when these films come out on DVD, watching DVD movies on Samsung Galaxy Note 5 time after time is more comfortable, even.
However, two of few drawbacks of Samsung Galaxy Note 5 are the device doesn't have a built-in DVD-ROM or DVD player for the playback of DVD movies; there is not big enough to hold any DVD disc. And that's a problem for all of us. So if you want to watch DVD movies on your Galaxy Note 5, you'll need to rip DVD to Galaxy Note 5 supported video formats for playing without any limitation. On this case, a DVD Ripper is required.
You may be lucky to find there are countless programs out here that allow you to make copies of DVDs and let you watch them the way you want to view them. But you may also be confused about choosing a most reliable and suitable tool. If so, here I recommend you try the Aimersoft DVD Ripper. Applying it, you can rip and convert DVD movies/DVD ISO to Galaxy Note 5 friendly formats with supper fast conversion speed and excellent output quality. Meanwhile the audio/video synchronization is very good. Plus, the DVD Ripper can also rip DVD to MP4/AVI/M4V/MOV/WMV/KV/VOB/FLV videos and FLAC, AAC, AC3, WMA, WAV, etc. audio formats for playing on OnePlus 2, Galaxy S6/S6 Edge, Nabi 2, Tesco Hudl 3/2/1, iPhone 6S, iPod Touch 6, iPad Pro, Surface 3, iPad Mini 4/3, Cloud Storage, Roku 3, PS4, Xbox One, etc.
This program is especially designed for Windows users (Windows 10 and 8.1/8 included). If you're a Mac user, pls get the Leawo DVD Ripper for Mac.
Now, Free download the best Galaxy Note 5 DVD Ripper to your Windows computer and start the program.


 Then follow the steps below to rip DVD to Galaxy Note 5 playable videos in a few clicks! The below guide takes Aimersoft DVD Ripper for Windows (Windows 8 compatible) screenshots for example. Below the quick start guide.
How to Rip and Convert DVD to Galaxy Note 5 friendly formats?
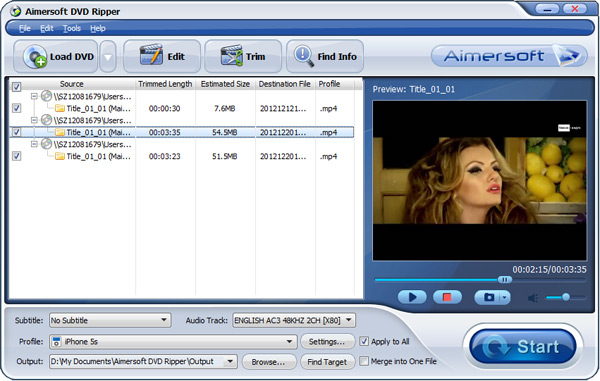
Step 1. Load DVD movie to the ripper software
First, insert a DVD disc into the computer DVD-ROM drive, back to the software interface and click the upper "Load DVD" button. Then it flashes right to you preloading the DVD content. And you'll notice that among the several titles there's a title ticked off. It is the main movie. You wouldn't have to consider other titles. BTW, the load of DVD folders, ISO files, and IFO files from your hard drive is also available. After the movies are loaded, you can preview them on the right viewing window and adjust volume or take snapshots freely.
Then follow the steps below to rip DVD to Galaxy Note 5 playable videos in a few clicks! The below guide takes Aimersoft DVD Ripper for Windows (Windows 8 compatible) screenshots for example. Below the quick start guide.
How to Rip and Convert DVD to Galaxy Note 5 friendly formats?
Step 1. Load DVD movie to the ripper software
First, insert a DVD disc into the computer DVD-ROM drive, back to the software interface and click the upper "Load DVD" button. Then it flashes right to you preloading the DVD content. And you'll notice that among the several titles there's a title ticked off. It is the main movie. You wouldn't have to consider other titles. BTW, the load of DVD folders, ISO files, and IFO files from your hard drive is also available. After the movies are loaded, you can preview them on the right viewing window and adjust volume or take snapshots freely.
 Step 2. Select the Output Folder Click "Browse" button to choose the path where you want to save the output movie files in.
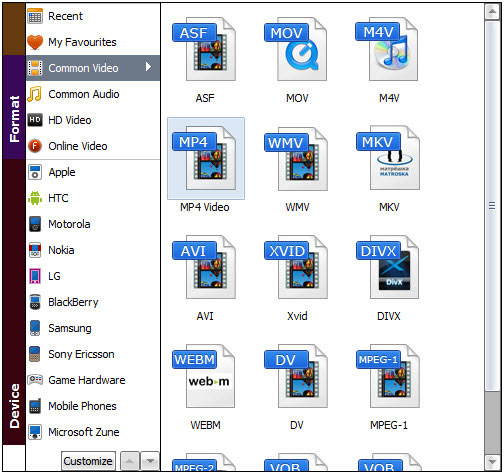
Step 3. Select output video format for Galaxy Note 5
Press the "Profile" drop-down menu and then select a video container format that the Galaxy Note 5 supports like MP4, WMV, AVI, etc. After that, click the "Settings..." button to adjust the output parameters including "resolution", "bitrate", "frame rate", and "encoder" to make the output video play best on your Galaxy Note 5.
Step 2. Select the Output Folder Click "Browse" button to choose the path where you want to save the output movie files in.
Step 3. Select output video format for Galaxy Note 5
Press the "Profile" drop-down menu and then select a video container format that the Galaxy Note 5 supports like MP4, WMV, AVI, etc. After that, click the "Settings..." button to adjust the output parameters including "resolution", "bitrate", "frame rate", and "encoder" to make the output video play best on your Galaxy Note 5.
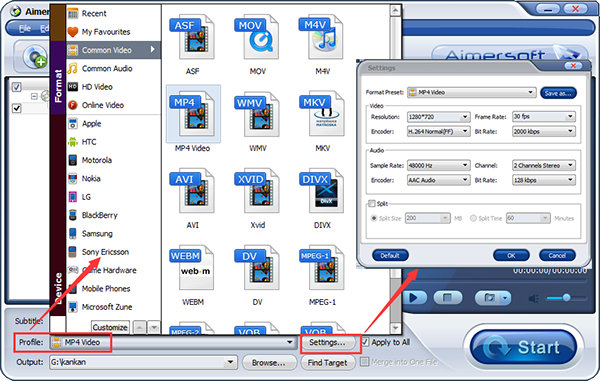 Tips: You can also select Galaxy model you have from "Samsung" category to get videos with optimized settings for playing on your any Samsung phones or tablets.
 Step 4. Start the DVD to Galaxy Note 5 MP4 conversion
Click "Start", and this program rips DVDs to a Galaxy Note 5 compatible file format. What surprises me is that the DVD copy was without flaw, almost without loss of quality. After the conversion, click "Find Target" button and check the output DVD movie on your computer. To watch DVD movies on Galaxy Note 5, then connect your Galaxy Note 5 to computer using the cable and do streaming.
Here I will show how to transfer music, movie files from PC or Mac to Galaxy Note 5 for enjoying anytime anywhere.
Additional Tips:
If you want to watch iTunes movies on Galaxy Note 5 as well as other all Galaxy Tab, Note, S-series tablets or smartphone, Aimersoft DRM Media Converter (Read Review) can help you to remove DRM protection of M4V, and then convert iTunes movies to Galaxy Note 5 supported formats with excellent video/audio quality and superfast speed on Windows. The software is specially designed for all portable devices, media players, smart TVs and more. Here is a tutorial to show you how to play iTunes movies on Samsung Galaxy devices.
Just enjoy your DVD movies on Samsung Galaxy Note 5 time!
Editor's Recommendation:
DVD to Dropbox | DVD to Nabi 2S | DVD to Seagate Central 3TB Personal Cloud Storage | DVD to Plex media server | DVD to AVI | Free Rip a DVD on Computer | DVD to Android devices | DVD to Amazon Kindle tablets | Disney DVDs to Kids Tablet | DVD to iPhone 6 plus | DVD to Nvidia Shield Tablet | DVD to Hudl 2 | DVD to iPad Air 2 | DVD to iTuens Library | DVD to Surface Hub | DVD to FCP
Step 4. Start the DVD to Galaxy Note 5 MP4 conversion
Click "Start", and this program rips DVDs to a Galaxy Note 5 compatible file format. What surprises me is that the DVD copy was without flaw, almost without loss of quality. After the conversion, click "Find Target" button and check the output DVD movie on your computer. To watch DVD movies on Galaxy Note 5, then connect your Galaxy Note 5 to computer using the cable and do streaming.
Here I will show how to transfer music, movie files from PC or Mac to Galaxy Note 5 for enjoying anytime anywhere.
Additional Tips:
If you want to watch iTunes movies on Galaxy Note 5 as well as other all Galaxy Tab, Note, S-series tablets or smartphone, Aimersoft DRM Media Converter (Read Review) can help you to remove DRM protection of M4V, and then convert iTunes movies to Galaxy Note 5 supported formats with excellent video/audio quality and superfast speed on Windows. The software is specially designed for all portable devices, media players, smart TVs and more. Here is a tutorial to show you how to play iTunes movies on Samsung Galaxy devices.
Just enjoy your DVD movies on Samsung Galaxy Note 5 time!
Editor's Recommendation:
DVD to Dropbox | DVD to Nabi 2S | DVD to Seagate Central 3TB Personal Cloud Storage | DVD to Plex media server | DVD to AVI | Free Rip a DVD on Computer | DVD to Android devices | DVD to Amazon Kindle tablets | Disney DVDs to Kids Tablet | DVD to iPhone 6 plus | DVD to Nvidia Shield Tablet | DVD to Hudl 2 | DVD to iPad Air 2 | DVD to iTuens Library | DVD to Surface Hub | DVD to FCP
Outline: How to transfer photo files from a CD, DVD, email or dropbox onto your computer. This works for portrait files, product image files, wedding picture files and more.
First, make a folder to store your pictures in. You may want to make the folder on your desktop or as a sub-folder in your "My Pictures" folder. To create the new folder, right-click on your desktop or inside your "My Pictures" folder. Scroll down to and highlight "New" and then click "Folder". The folder will be labeled "New Folder". You can change the name to whatever you like by clicking on "New Folder" once, and then when the letters turn blue, type the new name in.
CD's and DVD's
Put the CD or DVD in the CD drive of your computer. Assuming it is using a windows operating system, open 'my computer' and double click on the CD drive. You can then click and drag the photos into the new folder you have created. You can also right click on the photos and select "copy", then right click on the folder and select "paste". The computer should then automatically copy the picture into the folder.
Email Attachments
Open the email with the photo attachment. In most programs, you open the email by clicking on the message.Most email systems display photo attachments at the top or the bottom of the message, with each photo separated, representing that they are different files. Often the name of the photo file will be underneath the actual photo. Look at the very top of the email under the "To and "From" or scroll down to the bottom of the email.
Right-click on the photo file name and select "Save Image As." You may also right-click on the actual photo or, in some email programs, you can just click on a link that says "download".
Select the folder you created as the target location for the download in the window that appears. You may also want to specify a file name by typing a name in the open field. Be sure to keep the extension the same. If the file has the extension ".jpg," be sure to save the file as "FILENAME.jpg" where FILENAME is the name you gave the image.
Select "Save." Your image will be transferred from your email to your folder. If you want to do this for multiple pictures, just repeat the steps for each picture.
Dropbox Files
The easiest way to copy files from Dropbox to your computer is to sign up for their service and download their program. It is free, and they will give you your own storage space to use, and they do not spam you or pass your information to other vendors. When we send you an "invite" to "share" the folder where we have stored you photos, you will get an email from Dropbox. In the body of the email there will be a link that says, "View "[name of the folder we sent]". When you click that link you should see the option to sign up for the service and download and install the application. Follow the instructions and after you install Dropbox, you should see a little icon of a blue, open cardboard box (the Dropbox logo) on your desktop or in your shortcut bar. When you click on that icon, you should see the folder with your photos in it. Open the folder, highlight all of the photos, right click and choose "copy". Right click on the folder you created to store your photos in and click "paste". The computer should then automatically copy the pictures into your folder.
There are two other ways to get your photos from Dropbox if you don't want to install the application on your computer. When you are signed in to the Dropbox website, you will see the folder we created with your photos in it. You can right click the entire folder and then click download. Dropbox will "zip" the photo files inside the folder, which compresses them and means that you must then "unzip" them once they are downloaded. "Zipping" also causes a very tiny loss of image quality. On the website you can also open the folder and right click each photo, and then click download. This is a more cumbersome way to get your photos because you must do each photo one at a time.
Source: http://www.thephotostudio.com/photography-blog/36-tips-how-to-transfer-photo-files-from-a-cd-dvd-email-or-dropbox-to-your-computer
Additional Tips: How to save DVDs on Cloud (Google Drive, Dropbox, OneDrive, iCloud, Seagate personal cloud media storage, etc.)
When you got the troubles of disc loss or damage or the space of physical hard disk is low, you can ripping DVDs to cloud lets you upload a personal DVD to the cloud (Google Drive, Dropbox, OneDrive, iCloud, Seagate personal cloud media storage and Box etc.) enable you can share DVD Movies with your family members or access your movies at home or on the road.
Almost all movies are encrypted with CSS copy protection. Decryption keys are stored in the normally inaccessible lead-in area of the disc. You'll usually get an error if you try to copy the contents of an encrypted DVD to Google Drive. However, if you have used a software player to play the movie it will have authenticated the disc in the drive, allowing you to copy without error, but the encryption keys will not be copied. If you try to play the copied VOB files, the decoder will request the keys from the DVD-ROM drive and will fail. You may get the message "Cannot play copy-protected files".
Now that it doesn't work to directly copy DVDs to Cloud, using DVD ripping software is the best way to rip DVDs to Cloud supports MP4, AVI, MOV, FLV, WMV etc. video files. Here we'd like to take Aimersoft DVD Ripper (Review) for example to introduce the steps, and it offers powerful yet easy-to-use functions, excellent video/audio quality, and fast ripping speed. The DVD Ripping tool is not only a professional yet easy-to-use DVD ripping application that helps you rip your DVD movies to whatever video or audio files. It is also your ultimate solution to rip any DVD regardless of DVD copy protections and region locks, including DVD CSS, region code, RCE, Sony ArccOS, UOPs, Disney X-project DRM to MP4, MOV, AVI, M4V, FLV, WMV, MPG, 3GP for storing in Cloud, or playing on all Windows media players, Apple iPhones, iPads, iPods, Apple TVs, Android tablets and smartphones, Surface tablets, BalckBerry, Sony PSP, PS3/PS4, Xbox 360/One, Wii, Roku, WD TV Live, etc.
Now, follow the guide below: http://www.hivimoore.com/2015/08/copy-dvd-to-dropbox/
It's so easy and convenient!
Editor's Recommendation:
Outline:
To play DVD films or TV shows offline and sort out DVD collection, some people may be seeking for the best Free DVD ripper or DVD Copier tools, but only end up with the functional limitation such as in the DVD to MP4/M4V/AVI/WMV/MKV/MPG ripping and the support for region/copy protected DVDs. It is wise to refer to the review of top Windows DVD Ripper and Copier softwares first before you figure out which is the best commercial software to rip, convert and copy DVD on Windows 10, Windows 8.1, Windows 8, Windows 7, XP, etc.
Editor's Note: The Digital Millennium Copyright Act (DMCA) forbids circumventing copy encryptions contained on commercial discs. The DMCA makes no exceptions for circumventing these encryptions for personal use. The hivimoore.com does not endorse piracy or any other illegal activity.
What is the Top Windows DVD Ripper and Copier Software in 2015?
According to industrial surveys, online response, user feedbacks and ownership recently, Aimersoft DVD Ripper shall be crowned the top commercial DVD Ripper and Copier brand for Windows.
This program earned the Top 5 Reviews Gold Award by providing a full array of DVD ripping, converting and editing tools. It also has an expansive library of preprogrammed output profiles that allow you to optimize your rip for whatever device you happen to be carrying around in your pocket. Let's see in the following review:
Why Choose Aimersoft DVD Ripper as the best Windows DVD Ripper and Copier Software?
1. Superior support any kinds of DVD
This fabulous DVD converter lets you convert any kinds of DVD without any barriers. It will helps you to remove all the restrictions of DVD, like CSS, Region, RCE, Sony ARccOS and PuppetLock. The supported DVD types include but are not limited to:
- Homemade DVD that contains your wonderful memories;
- Encrypted DVD that protected by CSS, Region or some other DVD protection.
You can rip all these DVD movies only with a few simple clicks. Apart from that, this DVD converting tool is regularly upgraded to support most of the new DVD discs and movies.
2. Convert 6X faster and keep excellent video quality
With the NVIDIA? CUDATM technology, the conversion is processed on NVIDIA's GPU instead of your computer's CPU, leaving more of your CPU available to handle other applications. That means Aimersoft DVD Ripper has six-time-faster standard and high-definition video conversion, higher quality, and smoother playback for all video. Now it's no trouble at all to convert DVD movies.
3. Conversion Choices
"The whole point of ripping a DVD is to watch it on a device that isn't connected to a DVD player. Smartphones, tablets and even some gaming systems are not compatible with this aging technology. Aimersoft DVD Ripper solves this problem by providing 175 preprogrammed output profiles that are specifically designed to optimize your rip for the device you own.
For example, say you have an iPad and you want to watch a physical DVD you bought in 2009 on it. There are no apps that will connect with a DVD player and stream it to your device over a Wi-Fi network, let alone one that syncs a DVD movie to your iPad and allows you to carry it around in your pocket. With Aimersoft DVD Ripper, all you need to do is select the iPad option from the library of output profiles and click Start. Then the application rips the movie and converts it to the exact specifications of the iPad. When it's done, you have a file that is perfectly tailored for your device. The same is true if you have a different kind of iPhone 6, iPad Mini 3 or any other iOS device.
This application also has output profiles that optimize rips for Android, Windows and BlackBerry devices as well as other mobile devices. The list of profiles is long when it comes to specific makes and models of devices, whether it be a Samsung, Nokia, Sony, Surface Hub, HTC, Amazon, Google, Asus, Acer, LG, Hudl 2, Nvidia Shield - the list goes on and on. The bottom line is that if you have a mainstream mobile device, there is a high likelihood that this application can rip a DVD into a format that is suited for your needs.
There are many other compatible devices, too. Most console gaming systems have large hard drives that are designed to hold large qualities of movies that can be played on demand without a physical disc. Aimersoft DVD Ripper can convert your DVDs for these systems; Nintendo, Xbox and PlayStation all have profiles. Their mobile counterparts such as the PSP and Nintendo DS also have the ability to play movies and have profiles for DVD conversion.
With the powerful DVD Ripper tool, you can also rip DVD to 3D videos and common/HD MP4, AVI, MKV, FLV, MOV, VOB, MPEG, WMV, MP3, AC3, M4A, WMA, etc. for portable player, projectors, 3D devices, HD TV, Plex, PS4, Xbox One, Roku, Wii, Cloud Storage devices, etc. The software allows you to manipulate technical aspects of the video such as frame rate, resolution and bitrate.
4. Ripping Attributes
The first feature we look for in any DVD ripper application is the ability to decrypt the copy protections found on commercial discs. Aimersoft has a built-in decrypter that can bypass encryptions such as CSS and region coding. Without this tool, nearly all the movies in your DVD library would be unrippable. The best aspect about Aimersoft's decrypter is the fact that it's integrated, automatic and invisible.
The process of ripping and converting files off your DVDs is quite simple. All you need to do is load the DVD, select the files you want, pick a preprogrammed output profile and click Start. Within a few minutes, you have an optimized file tailored for whatever device you want.
Another reason you might want to rip a DVD is to extract the audio. Aimersoft DVD Ripper has the ability to act as a DVD to MP3 converter. It also can convert the audio found on your disc to a number of other formats, including M4A, WMA, WAV, AC3, OGG and more. The quality of the converted sound is identical to the sound on the disc.
One of the things that this application cannot do is perform a straight rip of the DVD's files and folders to your hard drive. In order to rip a video off a DVD, you must perform a conversion. You can perform what Aimersoft calls a “lossless DVD copy,” which extracts the VOB file but not the file structure of the disc. This is an odd omission, but it's not uncommon for software in this category.
This DVD ripper also allows you to perform basic edits on videos before you rip them. If you have a movie that you just want a certain scene from, you can use the trim feature to remove the rest of the movie. When you click Start, you'll only rip the scene you want. You can also crop the video and add watermarks, basic effects and subtitles.
The another nice thing about this app is that it allows you to perform a certain amount of editing before the DVD is ripped. You can select the chapters, subtitles, extras and audio track you want to include and even trim the border around a movie. This enables you to make the file much smaller so that it fits onto a device.
5. Search and embed DVD movie information
This DVD ripping software offers a quick access to search for the metadata of the loaded DVD movies, which includes the movie director, actors, descriptions, release date, genre and more. All these information is changeable and courtesy of TMDb (www.themoviedb.org) After you get the movie information, you can embed these metadata to DVD movies with a simple click. The movies will automatically sync to iTunes after conversion. Hence, you can manage your DVD movies with iTunes in an easier way.
6. Customization Tools
In addition to enabling you to adjust technical aspects of your video such as resolution, aspect ratio, frame rate and more, this software comes with a video-editing module that allows you to alter the video before you rip it onto your hard drive. You have the ability to trim unwanted footage, crop the video and adjust picture values such as brightness, contrast and saturation. You can also add basic effect filters and deinterlace video footage. Granted, you can't do any major surgery to videos, these basic tools provide a nice tool box so you can get what you want and make minor alterations.
7. Help & Support
Aimersoft offers some of the most comprehensive customer and technical support in this category. If you need assistance, the first thing you should do is consult the company website. You can find an extensive FAQs section for all Aimersoft products as well as a how-to section that can walk you through everything you need to know about each product. If you need to talk to an actual person, the company offers 24/7 live chat support, so you can chat online with support personnel.
Summary:
Aimersoft DVD Ripper came out on top of our review of the best DVD rippers because it’s a powerful, safe, cheap and easy-to-use program that enables you to rip your DVD films and customize them for playback on any device you own. It is a great choice for DVD ripping and copying software.
Aimersoft DVD Ripper Reviews:
 See more at: http://www.hivimoore.com/2015/03/best-dvd-ripper-copier-review/
Plus: How to Use the Best DVD Ripper for Windows?
First, download, install the Windows DVD ripper software:
Simply follow the DVD Ripper guide to any regular video/audio formats that are compatible with tons of popular devices, including iPad Air 2, iPhone 6/6 plus, iPod 5, Apple TV 3, Surface Hub, Surface 3 & Pro 3, Amaon Kindle Fire HDX, Hudl 2, Nvidia Shield, Nabi 2, Nexus 9, Plex, Xbox 360/One, PSP, PS4, PS3, WDTV, smart TV, Projector, Windows Media Player, VLC, QuickTime, etc., you can import the ripped DVD to Sony Vegas Pro, Windows Movie Maker, Avid Media Composer, Adobe Premiere Pro CC/CS, Pinnacle Studio well as upload the ripped DVD video to YouTube, Vimeo, Facebook, Google plus and many more.
See more at: http://www.hivimoore.com/2015/03/best-dvd-ripper-copier-review/
Plus: How to Use the Best DVD Ripper for Windows?
First, download, install the Windows DVD ripper software:
Simply follow the DVD Ripper guide to any regular video/audio formats that are compatible with tons of popular devices, including iPad Air 2, iPhone 6/6 plus, iPod 5, Apple TV 3, Surface Hub, Surface 3 & Pro 3, Amaon Kindle Fire HDX, Hudl 2, Nvidia Shield, Nabi 2, Nexus 9, Plex, Xbox 360/One, PSP, PS4, PS3, WDTV, smart TV, Projector, Windows Media Player, VLC, QuickTime, etc., you can import the ripped DVD to Sony Vegas Pro, Windows Movie Maker, Avid Media Composer, Adobe Premiere Pro CC/CS, Pinnacle Studio well as upload the ripped DVD video to YouTube, Vimeo, Facebook, Google plus and many more.
More Popular Topics:
In this guide I'll show you how to free put DVDs onto iTunes 12/11. Instead of spending a bunch of money on the iTunes store and buying movies through iTunes you can actually copy any movie from any DVD onto iTunes 12 and then sync them to your iPhone 6 plus, iPad Air 2, iPad Mini 3/2, iPad 3, iPod Touch 5 and more. That's what I'm going to show you how to do today.
Here are two user's questions from applevis.com and discussions.apple.com:
Q1: Putting DVDs into iTunes?
"Hello, I am wanting to put some DVDs into iTunes then I can transfer them onto my iPad Air so I can watch them while on holiday later next month. Does anyone know of an accessible way to do this on the pc? Another thing, these DVDs are all legally purchased, and not copied.
Thanks for any help."
Q2: Copy DVD's to iTunes?
Hello, I was wondering what is the easiest way to copy my personal DVD's to my iTunes library so I can watch them on my iPod touch. I have tried some free ripper tool but I am having a lot of trouble with it and it is painfully slow.
Any suggestions? Has one one else experienced any issues? Any help would be appreciated.
MacBook Pro, Mac OS X (10.6.7)"
As always, you can't import DVD video files to iTunes directly, and neither can you enjoy HD movies without costs in iTunes Store, despite its advance to iTunes 12. So how to import DVD movies into new iTunes 12 for watching, and furthermore convert DVD video audio file to all devices besides Apple iPhone, iPad, iPod.
In this walkthrough I'm going to tell you how to convert DVD into a *.mov file using the open source cross-platform VLC media player. This free program is available for Windows XP, Windows Vista, Mac OS X, and most distributions of Linux including Ubuntu, Fedora, SuSe, and many others. When you are done you will have a single file that you can play either in VLC media player on any computer, or you can import the file into iTunes on a Mac or PC and be able to play it within iTunes or QuickTime, and then you can sync it to your iPhone 6, iPad Air, iPad 3, iPod Touch 5, etc. to watch any time.
NOTE: This walkthrough is meant to be used ONLY with DVDs that you own for backup purposes only.
How to Rip a DVD to iTunes 12/11 with VLC?
Step 1: Go to http://www.videolan.org/vlc/ and download VLC media player for free for your operating system, then install it.
Step 2: Insert the DVD you want to copy into your computer and open up VLC media player.
Step 3: Select 'File' on the top menu, and select 'Open Disc…' from the drop down menu.
Step 4: Select the Title you want to copy. On most movies this will simply be '1', and if there are any special features they will be titles '2', '3', and so on. Usually with TV series on DVD '1' will be the first episode, '2' will be the second, etc. Put in the title number box the number you believe is the title you want to copy. At this point it's a good idea to check that you're going to rip the correct video file so go ahead and click 'OK' at the bottom and the correct Title should begin to play. If this isn't the correct Title, then try a different number until you get the right one, once you have the correct title continue to the next step.
Step 5: Check the box that says 'Streaming/Saving:' on the bottom left hand corner, at this point the 'Settings…' box should not be grayed out so click on it so we can fine tune the video and audio encoding settings.
Step 6: Check the 'File' box at the top and then click Browse. Now you will need to select where you want to save the file and what you want to name it. Select a directory where you would like it to be saved. My Videos on a PC or your Movies folder on a Mac/Linux is a good place for now. Make sure that at the end of the name you add '.mov' because VLC will not automatically add the file extension.
Optional: For advanced users, if you are not planning on importing this into iTunes to use on an iPhone 6/iPad Air you can select a different file extension such as .mpg, but just make sure that when you encode it you use the correct MPEG TS encapsulation method and mp4v or other corresponding transcoding option.
Step 7: Now we need to select the encapsulation method. On a PC or Linux you need to select MOV and in OS X select QuickTime.
Step 8: Check the box next to 'Video' in transcoding options. In the drop-down menu select 'h264' under the 'Bitrate' select '1024' and under 'Scale' select 1.
Step 9: Check the box next to 'Audio' in transcoding options. In the drop-down menu select 'mp4a' under the 'Bitrate' select '192' and under the 'Channels' select 2.
Step 10: Now click 'OK' at the bottom on the box and it will close. Click 'OK' again in the original box and the ripping will begin. Depending on the speed of your computer this can take anywhere from 15-40 minutes to import every half hour of video.
Step 11: Import the video into iTunes by dragging it into the Movie section. you can now play the movie right in iTunes, enjoy!
Optional: If you wish to sync the video with your iPhone 6/iPad Air/iPod 5 etc. ios devices, go to the Movies tab within iTunes, select any videos you wish to put on your iPhone 6, right click them and select 'Convert Selection for iPod/iPhone'. iTunes will automatically convert the videos to the correct format for your iOS devices and you can now sync them straight to your all iOS devices!
For Reference: A regular 30 minuet TV show will produce a roughly 200MB file, and a 1.5 hour-long movie will produce a roughly 800MB file.
NOTE: VLC 2 and higher uses a new video library. Many apps use the VLC video library to 'do their thing.' To repair the video library you must install the VLC library into your Mac in a place where it is accessible by other apps such as VideoDrive. Download the installer from VLC: http://download.videolan.org/libdvdcss/last/macosx/. Run it. Check with Terminal to verify a proper installation: Type this in Terminal: file /usr/lib/libdvdcss.2.dylib You should see this: /usr/lib/libdvdcss.2.dylib: Mach-O universal binary with 2 architectures /usr/lib/libdvdcss.2.dylib (for architecture i386): Mach-O dynamically linked shared library i386 /usr/lib/libdvdcss.2.dylib (for architecture x86_64): Mach-O 64-bit dynamically linked shared library x86_64 If you see "Unknown File" or similar message, it did not work. Apps that use the VLC video library will now work again.
This method may be more complex for the primary users, the following is an VLC alternative:
VLC Alternative: A top DVD Ripper for Apple/Android/Windows Devices
To get the work done, one simplest way is only a professional DVD Ripper. There are a number of DVD rippers that do the work perfectly. One of the best DVD rippers in the market is the Aimersoft DVD Ripper, which is the coolest tool to convert your DVD to iTunes 12/11 playable video formats.
Why choose the DVD Ripper to convert DVD to iTunes 12/11 supported format?
The answer is simple. the top DVD to iTunes 12 converter provides good quality output regardless of the end device that you are going to use. It quickly converts DVD to any format supported by iTunes in just a few mouse clicks! Besides, you can crop the black bars, add special video effects, split or merge videos, etc. as you like with the built-in editor. Just get it and rip DVD movies to iTunes 12/11 supported videos for playback on your all iPad, iPhone, iPod and Apple TV models, including the lastest iPhone 6, iPhone 6S, iPad Air, iPad Mini 2, iPad 4, iPhone 5S/5C, iPod Touch 5 and Apple TV 3, etc. The equivalent Mac version is DVD Ripper for Mac.
Step 1. Load DVD movies or ISO image files.
First, insert your DVDs into DVD Drive, and then launch the DVD ripper software, drag the DVD files to the program; Or you can get to "File" Menu, click "Load DVD" to draw into DVD movies you want to rip.
 Step 2. Choose output format and output folder.
If you do not have a ready folder, create one where you can easily locate it. The video formats available are M4V, MP4 or MOV. In this case, we shall select MP4 format from the common video choices only for description purposes.
Step 2. Choose output format and output folder.
If you do not have a ready folder, create one where you can easily locate it. The video formats available are M4V, MP4 or MOV. In this case, we shall select MP4 format from the common video choices only for description purposes.
 Step 3. Intiate the DVD to MP4, M4V or MOV conversion process.
After selecting your desired format and the destination file you can opt to make changes or settings and if you are OK with the way the format is click the Start button to initiate the conversion. This might take some time; however, it is important to note that the conversion time depends on the size of the DVD movies.
Once you ascertain that the conversion is successfully completed, you can import the file anywhere you wish to even in the media player as long as the file is iTunes friendly.
Step 4. Import the ripped DVD movies into iTunes 12.
1). Launch iTunes 12.
2). Add the just ripped DVD movie files into iTunes 12 by clicking "Add to Library" under File. Movie file will be automatically imported to the proper video category, then play the converted video directly on iTunes 12/11.
If it is successfully transferred, A thumbnail of the video file will appear in your screen. If the transfer is successful you can further sync the movie files to your iPhone 6, iPhone 6 plus, iPad Mini 2, iPad Air 2, iPad Air, iPad 4/3, iPod Touch 5, Apple TV 3 and other portable devices and you can easily enjoy them everywhere you wish to.
About iTunes Supported Format:
iTunes can currently read, write and convert between MP3, AIFF, WAV, MPEG-4, AAC and Apple Lossless (.m4a).
iTunes can also play any audio files that QuickTime can play (as well as some video formats), including Protected AAC files from the iTunes Store and Audible.com audio books. There is limited support for Vorbis and FLAC enclosed in an Ogg container (files using the Ogg container format are not natively supported) or Speex codecs with the Xiph QuickTime Components. Because tag editing and album art is done within iTunes and not QuickTime, these features will not work with these QuickTime components. As of Snow Leopard, iTunes 9 (Mac) will play HE-AAC / AAC+ internet streams. The latest version of iTunes (Win/Mac) supports importing audio CDs with the default iTunes standard file format of AAC at 256 kbit/s, but users can choose from 16 kbit/s to 320 kbit/s constant bit rates (CBR) in either AAC or MP3.Importing of audio CDs into MP3 or AAC formats can also be accomplished using variable bitrate (VBR) encoding.
The Windows version of iTunes can automatically transcode DRM-free WMA (including version 9) files to other audio formats, but does not support playback of WMA files and will not transcode DRM protected WMA files. Telestream, Inc. provides free codecs for Mac users of QuickTime to enable playback of unprotected Windows Media files. These codecs are recommended by Microsoft.
In addition to importing CDs into the iTunes library, the user can also import non-Apple mp3 files from Amazon.com and other sources. This can be accomplished by either right clicking on the file, selecting open with, and then selecting iTunes or dragging the file into the open iTunes window. Alternatively, for Amazon.com mp3s, the Amazon MP3 Downloader application will automatically import the mp3 files into the iTunes library.
Additional Tip:
If you get some H.265/HEVC, MKV, FLV, M4V, WMV, VOB, MOV, AVI, Tivo, XAVC, M2TS etc. videos, and have trouble to play these Videos on your iTunes or other devices, you're in the right place. Similarly, we need to solve the problem is still compatible format. You can get the Wondershare Video Converter Ultimate to transcode SD/HD Video files to iTunes friendly format m4v/mp4 with the best video/audio parameter settings. Download this software and follow the steps to try it out now!
That's all!
More Popular Topics:
Step 3. Intiate the DVD to MP4, M4V or MOV conversion process.
After selecting your desired format and the destination file you can opt to make changes or settings and if you are OK with the way the format is click the Start button to initiate the conversion. This might take some time; however, it is important to note that the conversion time depends on the size of the DVD movies.
Once you ascertain that the conversion is successfully completed, you can import the file anywhere you wish to even in the media player as long as the file is iTunes friendly.
Step 4. Import the ripped DVD movies into iTunes 12.
1). Launch iTunes 12.
2). Add the just ripped DVD movie files into iTunes 12 by clicking "Add to Library" under File. Movie file will be automatically imported to the proper video category, then play the converted video directly on iTunes 12/11.
If it is successfully transferred, A thumbnail of the video file will appear in your screen. If the transfer is successful you can further sync the movie files to your iPhone 6, iPhone 6 plus, iPad Mini 2, iPad Air 2, iPad Air, iPad 4/3, iPod Touch 5, Apple TV 3 and other portable devices and you can easily enjoy them everywhere you wish to.
About iTunes Supported Format:
iTunes can currently read, write and convert between MP3, AIFF, WAV, MPEG-4, AAC and Apple Lossless (.m4a).
iTunes can also play any audio files that QuickTime can play (as well as some video formats), including Protected AAC files from the iTunes Store and Audible.com audio books. There is limited support for Vorbis and FLAC enclosed in an Ogg container (files using the Ogg container format are not natively supported) or Speex codecs with the Xiph QuickTime Components. Because tag editing and album art is done within iTunes and not QuickTime, these features will not work with these QuickTime components. As of Snow Leopard, iTunes 9 (Mac) will play HE-AAC / AAC+ internet streams. The latest version of iTunes (Win/Mac) supports importing audio CDs with the default iTunes standard file format of AAC at 256 kbit/s, but users can choose from 16 kbit/s to 320 kbit/s constant bit rates (CBR) in either AAC or MP3.Importing of audio CDs into MP3 or AAC formats can also be accomplished using variable bitrate (VBR) encoding.
The Windows version of iTunes can automatically transcode DRM-free WMA (including version 9) files to other audio formats, but does not support playback of WMA files and will not transcode DRM protected WMA files. Telestream, Inc. provides free codecs for Mac users of QuickTime to enable playback of unprotected Windows Media files. These codecs are recommended by Microsoft.
In addition to importing CDs into the iTunes library, the user can also import non-Apple mp3 files from Amazon.com and other sources. This can be accomplished by either right clicking on the file, selecting open with, and then selecting iTunes or dragging the file into the open iTunes window. Alternatively, for Amazon.com mp3s, the Amazon MP3 Downloader application will automatically import the mp3 files into the iTunes library.
Additional Tip:
If you get some H.265/HEVC, MKV, FLV, M4V, WMV, VOB, MOV, AVI, Tivo, XAVC, M2TS etc. videos, and have trouble to play these Videos on your iTunes or other devices, you're in the right place. Similarly, we need to solve the problem is still compatible format. You can get the Wondershare Video Converter Ultimate to transcode SD/HD Video files to iTunes friendly format m4v/mp4 with the best video/audio parameter settings. Download this software and follow the steps to try it out now!
That's all!
More Popular Topics: